Showing posts with label Beads. Show all posts

Wednesday, March 9, 2016

Silver Crescent Necklace


Like the necklace I made for Ysmay upon stepping down as Bhakail's A&S champion, this chain is based on a Roman chain, the design for which I learned at Pennsic during a class. A link to a museum photo of a Roman wire wrapped chain can be found here. 

Silver Wheel Award Medalion

Silver Wheel Award Medallion

Saturday, January 2, 2016

Gifts for their Excellencies Bhakail

On stepping down as baronial A&S champion I presented their Excellencies Bhakail with a few gifts as a token of my appreciation for being chosen their champion.


Above are 4 "Islamic" folded glass beads (in Bhakail colors) which I added to fibula I wire wrapped and sharpened myself. I like the folded bead design for these tokens, because I feel it looks like a flame, an item which is related to Bhakail's heraldry.


Above is a necklace I make for her Excellency. The chain is based on a Roman chain, the design for which I learned at Pennsic during a class (sadly can't find at the name of the instructor at the moment). Erica helped teach me how to do the actual wire wrapping. A link to a museum photo of a Roman wire wrapped chain can be found here. The glass beads were made by me, the small gold beads were store bought. The necklace is in Bhakail colors, with a Salamander focal bead.

Wednesday, December 30, 2015

Wine Charms

Wine glass and bottle charms made for the populace choice prize at Bhakail Yule. Red and Black are Bhakail colors. I think THIS was the video I used from YouTube to teach me how to make the charm itself. I totally bought the bottle of wine to match the tokens and Bhakail's colors.


Folded Beads

First attempts at folded crescent and bird shaped pendants from an article on Islamic beads by Robert K. Liu published in Ornament Magazine. This is something I did a while ago, but never got around to posting.

-At least one of these cracked after making, so with these beads I need to be sure to keep well heated in the torch
-I need to work on the bird. The shape i'm pulling the crescent into is not nearly as close as I'd like it to be. Perhaps folding the crescent off mandrel would help, making it easier to pull out of shape?

Another good source for information on folded beads in general is an article by Tom and Sage Holland


Tuesday, October 20, 2015

Artifacts of a Life

The purpose behind the Artifacts of a Life A&S competition was
Me at Artifacts of a Life
to create several A&S items that were all tied to a specific time period and context. I began planning for  this event as soon as it was announced. I knew I wanted to create an Anglo-Saxon glass bead necklace and connect the necklace to the person who would have worn it. While I was searching for an artifact to recreate, I came across a photograph, found on the Pintrest board of another SCA bead maker, of a necklace in a museum. Using the reference on the card, I ordered the archaeological report form my library, and started working on the necklace. I added two smaller bead strings from that archaeological report to my project, as multiple artifacts were required for the event.
Pintrest museum photo.


Below are some pictures of my display, and a link to my documentation can be  found here.


The event was great! Talking to the judges and the people who stopped by was great. Seeing some of my friend enter as well was great! And I liked that a bunch of us wore clothing connected to our entries. You can see me in my first attempt at Anglo-Saxon garb above. The main feedback I got from judges this time around was a suggestion about my display. Some pictures of the display are below. Basically, I think I want to have each string displayed singly, rather than on the board in imitation of the picture from the archaeological report. I want people to be able to pick up the beads strings. And I want to make the pictures of me wearing the strings larger so they are more evident and make more of an impact. This is something to work on before K&Q A&S in February.

photo of my display
photo of my display
I was privileged to take a very very close first prize in the "traditional" category. I was also honored with a token by the Baroness of BBM.

An account of the event can be found on the EK Gazette

Saturday, September 26, 2015

Two September demo/teaching events

A Day at the Solar -
This was a very nice small A&S event where the focus was not on classes, but on creating opportunities for people to try different arts that were being displayed and demonstrated over the course of the day. This is actually the way I do most of my teaching, so it worked out well. I had one particularly enthusiastic person stop by, and because we were not very busy with people, she had the chance to make 4 beads that day. I'm glad I could let her play so much with the torch!

Beads made at this event by someone I taught.
Wrightstown Renaissance Faire -
Since this event was a demo, there was not an opportunity to teach, but people from the faire stopped by to watch Aibhilin and I make beads during the day. One day I'd love to bring a more period fire source to an event like this!

A view of our booth in the SCA area of the faire.

Silver Rapier Glass Bead Award Medalion

My first attempt at a glass bead Silver Rapier  award medallion was quite a mess. I tried to imitate the swept hilt of the rapier, and I just could not get all that detail into a bead of the size I wanted to make (note: I shaped the bead with my lentil press). My second attempt, while not great, at least helped me to realize that a simplified design (where I just drew the knuckle-bow of the sword) would work better.


attempt 1

attempt 2

By the third attempt I had a working design, which I turned into a medallion and traded to a friend. The main issue I had with this version of the bead was that the sword did not have a point!


After one more only so-so attempt at this bead I finally managed to get one that I like. In the design I emphasized the pommel and end of the quillons by adding a small dot to the end of the crossed lines I drew on the bead. I made the sword point by heating up the tip of the line and quickly pulling it into a point while removing a bit of glass. Finally, I only melted the design part way into the bead so that the design would stay crisp. Glass will sometimes distort and expand as it melts into glass, and white is a very soft color. Over time, I might be able to make this better by making the design with a thinner stringer of glass.


Thursday, August 20, 2015

Grave 50 Portway Andover

Below is a picture of a bead string (grave 50) from the  Portway Andover excavation report.  This is the third bead string I have recreated from that report, and I completed this project for the Artifacts of a Life event at the end of September.

Historic Glass Beads

This bead string, (which is interpreted as a bracelet) had 25 glass beads, 4 amber beads (which I recreated in amber colored glass), one fragmentary metal bead (which I did not replicate), and two Roman coins (small copper colored store bought medallions were used as a substitute).

My recreation
Thoughts on my recreation process

None of the beads on this string were very advanced, so technically, this was a relatively easy bead string for me to recreate. Any difficulties I had in recreating this bead string came about because some of the beads had uneven shapes or mistakes in their design, which I tried to replicate this time around as exactly as I could manage.

Replicating beads with specific mistakes actually takes me a good bit more time than replicating perfect beads of the same design, because I have to observe the historic bead a bit more closely to figure out how to make the same mistake found on the historic bead. It also takes the same amount of technical skill to replicate a specific mistake on a bead.

If I was talking with a newer bead maker who was interested in reproducing this bead string, I would encourage that person to attempt to make the beads as best they could, and not to worry about replicating a specific mistake. But, if they did make a mistake on a bead, I would tell that person to keep those beads with mistakes in the final project. In that way, I think a bead string would come to have the "feel" of the original, with its combination of beads with imperfections, and more perfectly executed beads.

Mistake Beads
To the right are examples of my "mistake" beads, beads which did not make it into the final bracelet. In most cases, this I rejected these beads because they did not match the extant necklace well enough, not because my overall technique was poor. I'll likely keep at least a few of these beads  to be given away later.  Some of the reasons these beads were rejected include
--wrong color: I was trying to mix my own transparent light brown for one of the beads, and it came out too dark
--wrong shape: I didn't notice that the documentation provided a better view of the bead until after I created it.
--wrong size: I made the bead a bit too big the first time
--wrong decoration pattern:  I included one too many or too few waves on a few of the beads, either by accident, or because I did not look closely enough at the historic bead the first time. In one case, I was also trying to replicate a bead with a very sloppy decorative technique, and gave it a few tries to see which one looked most like the period bead.
--large air bubbles in the bead: This is the one actual technique "mistake" that I made during this recreation project. I trapped several large air bubbles in one of the beads. This is a problem, because air bubbles increase the risk of bead breakage.

Thursday, July 16, 2015

Grave 19 Portway Andover

This small bead string is from Grave 19 of the Portway, Andover Anglo-Saxon Cemetary.


I completed a recreation of the above small bead string (likely a bracelet) over the course of 3 evenings. It took 2 evenings to make the beads, and 1 to remake a few beads that I was not fully happy with. I was originally not very excited about this project. I primarily made it to make sure that I would have enough items to enter for the Artifacts of a Life event, the event I created the larger necklace from Portway for. The technical level of this bead string is very low for me (no decoration, minimal shaping), and I didn't think it all that pretty to begin with. However, I'm glad that I did recreate this string, because actually seeing my recreation transformed how I thought about the bead string.


In person, this small bead string is quite adorable. Maybe my feelings changed because I could actually hold the string, instead of just looking at it on the page. Maybe it's the fact that a newly created bead string is so much more shiny than the historic one, which had been in the ground for centuries. Having the bead string in front of me also helped to emphasize just how symmetrical it was, especially towards the center of the string, and my modern eye really appreciates this symmetry. The order of the beads in the grave was mostly preserved, so this bead string is a likely example of the aesthetics under which Anglo-Saxons strung their beads.  The symmetry is not perfect, but it is quite obviously there, which is something I have found, to a greater or lesser extent, with most of the Anglo-Saxon bead strings I have recreated.  The distinction between light and dark beads is also very evident (another idea which is prevalent in the Anglo-Saxon aesthetic). There are many dark blue/black beads, with a fewer lighter white/red beads placed at regular intervals among the darker beads.

A few technical thoughts about my reproduction:
-The beads were made to match the size of the historic beads to within a couple of millimeters size.
-I forgot to try to match bead perforation sizes with the historic necklace, so that aspect of the recreation is not as accurate. However its not something that is very evident when the necklace is displayed/worn.
-A few of the beads (the white ones) were simply not listed in the description of the grave. The necklace is described as being made of "glass and other beads." I think these white beads are not glass (maybe stone?) but I've recreated them here as glass beads because that is the material I work with.
-I was not happy with my first attempt at recreating the bicone white bead, because my bicone was much straighter and more precise than the original. It just didn't look right when strung. So, I tried again, this time making it a bit rounder and it worked out well.  I also burned the glass slightly the first time, so I was a bit more careful the second time and turned down my flame and tried not to overwork the bead.


The bead on the bottom is my first attempt. The top bead is my second attempt.

-The same thing mentioned above happened for the largest black bead in the string. The edges and lines of my first recreated bead were too straight, so I tried again it, rounding the bead out slightly more the second time
-Finally, bead #25 is an odd one. It has red glass at the core, and then clear glass over-top, but it is not described in the report as an "encased" bead, and it's very unevenly made. The authors of the report make reference to a "swirl technique" which was referenced in Beck's bead classification from 1927, so I've ILL'ed that book to learn more.

Tuesday, July 7, 2015

Bead Kiln- playing with stringer (part 2)

In my last blog post I talked about how I tried to do stringer work with the firebrick kiln. I noted that the method I used was from a YouTube video created by a French reenactment group, but how a slightly different method was proposed by one of my scholarly articles that I wanted to try. Below is a review of the information from the scholarly article, and then my thoughts about my attempt to use this method.

From my last blog post: One of my sources, archeologists Tine Gam, has done some experimental archeology herself, and she proposes a slightly different method.... Gam thinks that the beads were made by drawing out a thread of glass from the pontil using tweasers, breaking off the tweaser marks (creating glass waste) and then melting the thread onto the bead. Moving the bead back and forth  would help create the zig-zag pattern. The image below is from the article by Gam.


I tried this method, and overall I have to say that it did not seem to work as well as the previous method tried. 

First, it was hard to pull a long even stringer from the blob of glass on the pontil. Perhaps the blob of glass on the pontil needs to be heated more before it is pulled, and either I removed the glass blob too soon, or the furnace is not getting things hot enough as it is curently designed? You can see the awkward looking stringer I pulled below.


It was relatively easy to snap off the end of the stringer as described in Gam's article to get a clean point after pulling it with the pliers. It helped to dip the pliers in water and shock the glass. The piece of glass I'm holding in the pliers below also looks very much like some of the glass waste found at Ribe and described by Gam in her article.


When I started trying to work with the small stringer, I noticed that as I was applying the design I would use up the  stringer I pulled and still not be finished creating my design. Perhaps in the past they pulled longer stringers, but, if so, how do you fit a long stringer  in the kiln easily if it is a closed kiln with a small opening---pull the stringer in the kiln itself? Also, because the furnace does not have one pin point source of heat, and you are sticking the entire stringer into a hot kiln, more than just the tip of the stringer ended up softening, making this method feel a bit more awkward to use.


Using the other method from the you tube video still seems to make more sense to me based on my very limited experience. In that method, the design was basically trailed out from a soft glob of glass, and how the artisan pulled the glass trail would influence the shape/size of the line decoration. More experiment with both methods is needed.

***
Finally, some thoughts on the kiln design for this workshop day. This time around I tried adding firebricks around the open fireplace to create more of a closed design. The goal was to create a hotter fire,  but I'm not sure it helped much, as I did not notice that it was much easier/faster to make a basic wound bead. Maybe I could not get the kiln closed enough, or maybe, as Alesone pointed out, it was too small (and held to few coals) to get truly hot. However, I did find that this time I had a bit more trouble keeping my base bead (and the stringer) at the temperature I wanted it. They would get either too hot, or not hot enough to work with. Both of these issues are ones beginner bedmakers have, so perhaps this is a case of me needing more practice using the period fire source. Also, perhaps trying to create a covered firebrick kiln altered things just enough to cause me trouble after I had practiced on the open firebrick kiln.

Its also very worth nothing that winding glass onto a bead requires that the glass and mandrel be held in a slightly different way than when doing modern lampworking or when over an open fire.  This was an adjustment I had to figure out as I was working, using the above mentioned YouTube video as a guide. The first time I tried to work as I normally did, it felt very awkward. You can see from the picture below the awkward angle created when I tried to apply glass to the mandrel in the usual way.


However, using glass on a pontil or a small piece of glass held in angled hemostats, I was able to get the correct angle for adding the glass to the mandrel in a closed kiln. The glass needs to come off the rod/pontil sideways and the mandrel is held parallel/not perpendicular to the tool holding the glass.


Note: Thanks to Decklan for his help during this workshop session! He helped me start the fire, build the kiln, and kept the bellows going.  Could not have done it without him:) Melchior also helped by taking a turn at the bellows, so my thanks to him as well!

Added 9/11: Below is a link to a video of me working with stringer as discussed above. Thanks to bruni for thinking to take video.

Tuesday, June 30, 2015

Pennsic Classes

Below are the titles and descriptions of the classes I will be teaching at Pennsic this year.

Recreating Anglo-Saxon Glass Beads
This class will begin with an overview of resources and information on Anglo-Saxon glass beads. I will review different bead types and information about how necklace styles changed over time during the Anglo-Saxon period. I will bring some of my own projects and documentation to share with the class in the hopes of encouraging students to take up some Anglo-Saxon-related recreation projects. During the second half of the class we will spend some time recreating a few Anglo-Saxon beads.
I only have 4 lampworking kits, but anyone is invited to attend to listen/watch. Please feel free to bring your own lampworking kit if you want to participate in the hands-on portion of the class. I will work with students to pick beads to recreate based on the skill level of the students and the class as a whole, but attendees should (at the very least) know how to make and shape a basic bead. More experienced lampworkers are encouraged to help out during the hands-on portion of the class and to bring any Anglo-Saxon-related resources and projects to share with the group. (2 hours)
This is a new class for me, and the first time I'm teaching a hands on class at Pennsic.

Recreating Historic Beads as a Beginner
Creating historically accurate glass beads is not as hard as you might think. You can make period beads at any skill level! Resources and strategies will be shared with attendees in this lecture/discussion class to help get you on the path to making beads that you can enter in A&S displays and competitions. We will discuss good starting points and first projects. The instructor will use her knowledge of Anglo-Saxon glass beads as an example, and share research and projects that others are invited to use and make their own.
This class is appropriate for beginning bead makers and intermediate bead makers who have not done much research into period beads or entered their beads into A&=S competitions before. Experienced bead makers are invited to attend to discuss their own first projects and to share additional resources and strategies.
I taught this for the first time last Pennsic. It is also the topic of a Tournaments Illuminated article I wrote.

Reproducing Glass Beads Using Archeological Reports
Learn how to find and use archaeological reports to reproduce glass beads (and other early period items) found in graves at excavation sites. These reports provide a wealth of information that is not available from museum or other websites. The focus of this presentation will be on Anglo-Saxon excavation reports and how I have used those reports to reproduce historic glass beads and necklaces. However, artisans interested in other early period items and crafts  should find this presentation valuable.
This is an expanded version of the presentation I gave at the Voyages of Discovery event last year.

Sunday, June 21, 2015

Fibula (Broach)


These fibulas were based off of ones Grimbold made that I saw at Artisan's Village. After he
explained his process for me, and, after I watched a few you tube videos, I made replica's of his fibulas. After that, I started looking for documentation.

The links below are from the British Museum and Peabody Museum. Thank you to the lovely people who keep pinterest pages that I can steal from!!

Note: The British Museum has a LOT of fibula images in its collection. Below I've only linked a very few.

Fibula with bead attached by a wire ring:
http://pmem.unix.fas.harvard.edu:8080/peabody/view/objects/asitem/search$0040/9/title-desc?t:state:flow=fad146ff-c292-45ec-af86-4069c07ce072
This images is sort of documenting the wire ring beads that I've used for tokens. I attach a little safety pin to those for people to pin to their clothing. The fibula, from what i've been seeing, is basically the ancestor of the safety pin, so...:)

Wire fibula with beads:
http://pmem.unix.fas.harvard.edu:8080/peabody/view/objects/asitem/search$0040/11/title-desc?t:state:flow=fad146ff-c292-45ec-af86-4069c07ce072

http://pmem.unix.fas.harvard.edu:8080/peabody/view/objects/asitem/search$0040/27/title-desc?t:state:flow=fad146ff-c292-45ec-af86-4069c07ce072

http://pmem.unix.fas.harvard.edu:8080/peabody/view/objects/asitem/search$0040/16/title-desc?t:state:flow=fad146ff-c292-45ec-af86-4069c07ce072

http://www.britishmuseum.org/research/collection_online/collection_object_details.aspx?objectId=682675&partId=1&searchText=fibula&images=true&page=2

Simple Fibulas, no beads:

http://www.britishmuseum.org/research/collection_online/collection_object_details.aspx?objectId=3295443&partId=1&searchText=fibula&images=true&page=1

http://www.britishmuseum.org/research/collection_online/collection_object_details.aspx?objectId=3295437&partId=1&searchText=fibula&images=true&page=1

http://www.britishmuseum.org/research/collection_online/collection_object_details.aspx?objectId=3295495&partId=1&searchText=fibula&images=true&page=1

http://www.britishmuseum.org/research/collection_online/collection_object_details.aspx?objectId=457675&partId=1&searchText=fibula&images=true&page=3

http://www.britishmuseum.org/research/collection_online/collection_object_details.aspx?objectId=457677&partId=1&searchText=fibula&images=true&page=3

http://www.britishmuseum.org/research/collection_online/collection_object_details.aspx?objectId=440485&partId=1&searchText=fibula&images=true&page=3


Thursday, June 18, 2015

Bead Kiln @ Artisans' Village (playing with stringer part 1)

At Artisan's Village I had a chance to try decorating a bead with zig-zags. This is a perfectly period bead design, and a green and yellow version of this bead can be found on my most recent Anglo-Saxon Necklace project (look to the top right of the necklace). Just like the last time I worked with the kiln, I used 120 COE glass.

The decoration technique I was trying to reproduce was one I saw in this video from Artisans d'Historie (a reenactment group in France).

 I used a pontil to gather the yellow glass I wanted to decorate my transparent dark blue base bead with. This glass had been melted in a small iron crucible. In period they might have softened glass on iron pan placed by the site of the fire, or melted glass in ceramic crucibles placed in the kiln (as seemed to be the case in the video). Once I had my glass gathered onto my pontil, I then touched the yellow glass to the blue bead, pulled back slightly, drew the glass to the other side of the bead and slightly forward, and touched down again.I repeated this pattern around the circumference of the bead.

It worked reasonably well. The yellow glass stayed soft enough for me to do this in the open fireplace I'm not sure 104 coe glass would have worked as well, but I have not tried that yet.  The only issue was that I didn't melt the decoration in all way before cooling the bead. I don't think I realized how raised the decoration still was until the bead cooled down.


One of my sources, archeologists Tine Gam, has done some experimental archeology herself, and she proposes a slightly different method. I will have to try this method out the next time I make beads. Gam thinks that the beads were made by drawing out a thread of glass from the pontil using tweasers, breaking off the tweaser marks (creating glass waste) and then melting the thread onto the bead. Moving the bead back and forth  would help create the zig-zag pattern. The image below is from the article by Gam.

                                             
However, Gam notes that the color of the waste glass with tweezer marks found at Ribe does not perfectly match  the colors used to decorate beads at Ribe. Instead, much of the glass waste with tweaser marks matches the colors of the base beads. Perhaps this means that the method used by the Artisan's d'Historie reinactors could be correct? Or, maybe more than one method was used?  I actually think this may be likely, simply because I know that in crafts there is often more than one way to do something. For example, there are at least three different ways in modern lampworking to make twisted glass canes.


Finally, Gam also notes that a small metal tool could be used to improve the zig-zag shape. After the lines have been placed, the glass designs can be moved slightly while it is soft. This is something I already do when making beads on my torch!  Gam notes evidence of this from Ribe, including a narrower shape to the corners of the zig-zags on some beads, and small air bubbles in the beads (as seen under a microscope)  that follow the direction the glass would have been pulled by the metal tool. I always thought I was fussing a bit to much when I tried to correct the shape of my decoration in this way, so it is good to know that this was done in period!


Gam, Tine. (1990). Prehistoric Glass Technology: Experiments and Analysis. Journal of Danish Archeology, 9.p. 203-213.


Pennsic Dirt Bead

I was asked to make a bead with pennsic dirt by a friend, and so I read up on these types of beads online, and then I did. The first step was drying the dirt  out in the sun so I could crumble it into a powder and remove the organic material. After that, it was very much like making a frit bead. I got the bead hot and rolled it over the dirt, which stuck to the bead. However, these beads should really  be encased with clear glass to protect the dirt, unlike a normal frit bead, which does not need to be encased. The encasing also has the benefit of magnifying the pennsic dirt, and making the bead look nicer, in my opinion. Since there is only a very little bit of dirt on the bead, it should be stable, though as they are a bit fragile due to the inclusion of the dirt, annealing these beads in the future would be a good idea!


These types of beads can be purchased at Heart of Oak's Etsy Shop

Wednesday, June 17, 2015

Artisans' Village

Wow.... what a day!  Sixteen bead makers showed up with their kits to make beads with us. A few stayed for only part of the day, but many hung out in the lampworking village the entire day.  It was beautiful to see, and I wish I had gotten a panoramic picture of the lampworking village with everyone happily making beads, demonstrating, talking, and teaching.


I had asked a few people (Elizabeth, Carowyn, Erlan, and Erica) months in advance of the event to demonstrate and teach in the village with me. However, during the week or two leading up to the event, people kept telling me, over social media or in person, that they would be attending. I'm glad they did, because it allowed us to prepare enough space for everyone to work. Luckily, the event site had a huge supply of picnic tables, and a mostly shady area for us to play in, because we could not have accommodated such numbers otherwise. We set eight picnic tables up in a large "U" shape to allow visitors to approach and ask questions. This was a set up that had worked well at River Wars in the past. I had brought two full loaner bead kits, which was a good thing, because while the kits were not needed (as most people had kits already) some individuals did need an item or two to complete their set up so they could safety play. It might be nice in the future if we get such large numbers again to indicate in some way which demonstrators were available to teach new people to make beads, but I think new people ended up getting to the people who could teach them as most of the teachers were located on the outer edges of the village. Rather than teaching many people how to make their first bead, I ended up working more at this event with people who had some lamp working background, trying to teach or explain new skills.

I very much hope this event happens again, because it was wonderful to see so many people making beads together!

One attendee suggested finding a structured time for the more experienced beadmakers to get together and teach/learn from each other. I will have to think about how to incorporate that into the lampworking village next time.

Monday, June 15, 2015

Bead string for Ysmay

Bead string for Ysmay in the colors of her heraldry (blue, red and yellow).

I'm wondering if heraldic colors work well for viking inspired bead strings because of the need for contrast in making a heraldic device. Including both "metals" (yellow and white) and non metals ensures there will be both light and darker colors that contrast well.   I happen to think that these three colors work very well together, and as a result, this necklace was a pleasure for me to design and make.

The polychrome beads are based on period Scandinavian beads that I first made several months ago for a largesse gift.

http://elysabethunderhill.blogspot.com/2015/02/viking-glass-bead-tokens.html

You can see that I've used the leftmost first two beads from the above link. By changing only one of the three colors on each bead I was able to make them work with Ysmay's heraldic colors.

I tried to bring a bit of period "randomness" into an otherwise modern symmetrical stringing by alternating which color annular bead (yellow or red) is next to the blue melon bead.

Thursday, June 4, 2015

SRWC_2015


Another artisan's row style demonstration! Aibhilin jointly demonstrated with me the entire time, and Druetta joined us during the last hour.

We had a few people make a bead for the first time, but the highlight was demonstrating for several young children, and then letting them pick a bead from my stash to take with them. They were so serious and deliberative in their choices! Aibhilin again brought ribbon again to string the beads on, which I think is a great idea.

The main lesson for the day is always tie down the ez-up, as towards the end of the demonstration it tried to escape over the roof of the building!

Also- I entered the firebrick bead kiln documentation (with pictures) based on the experiments Aibhilin, Bruni, and I did into the populace choice competition, where it won!  So, go us :)

Wednesday, June 3, 2015

Two beads make with different fire sources


I realized the other day that I had made two of  the exact same bead, one on my torch (left), and the other in the experimental firebrick fireplace (right) This amused me greatly so I had to share. You can see that the bead made in the fireplace is less perfectly formed. However, this is not because of the fire source, but rather because of my inexperience using it. The bead made in the fireplace looks more like a bead that a beginner might make. It is not perfectly round, the dots are less evenly spaced, and one of the dots looks more like an oval and less like a round dot. Over time, as I practice, I imagine I'll get better. However, using coal fueled fire place is reminding me a little bit of what it is like to be a new bead maker again when I didn't "know" my fire.

Sunday, May 31, 2015

More Period Beadmaking Experiments

Two weekends ago I went to Ysmay & Mael Eoin's house to make beads in their back yard using the coal and firebrick fireplace I first experimented with in early may . I was going to try to do this myself, but luckily Astrid stopped by to watch and her help ended up being invaluable. Some notes from our experiments are below.

1. More than one person is needed. Two or preferably three people work best. While, since I have the air mattress blower, I don't need someone to constantly work the bellows for me there is still a lot going on when making beads (tools get lost and are needed, and sometimes you want to change up how much air is being blown into the kiln). An assistant is necessary.

2. Having three people available, one to help with situation awareness (and take pictures) is also important. As they do on occasion, a small piece of charcoal popped out of the fireplace. It landed about 5 feet away, beyond our field of vision, so we did not catch it as early as I would have liked, and some of the mowed  grass still on the lawn started burning. It was quickly put out, but it reinforced the need for more eyes and an increased attention to safety when doing these experiments.

3. Continuing on the issue of safety a few other thoughts include:
--making sure there is no dry/dead grass around the area we are working.
--wetting down the area around the furnace
--having a very large bucked of water available (in addition to the fire extinguisher).
--making sure the work area around the furnace is clean and not to cluttered with tools

4. 120 COE glass is amazing. We tested 104 COE glass and the fireplace  was hot enough to melt it, but the 120 COE Satake lead glass I purchased worked *SO* much better. A higher COE means the glass is softer and easier to manipulate. We had beautiful coils of glass form when we wound the glass onto our mandrels. At this point, I can very generally document leaded glass in period using articles from scholar Julian Henderson, who writes a lot about ancient glass. I'll have to look into this a bit more before writing up formal documentation to figure out how leaded glass is different from regular soda-lime glass, and exactly where and when this glass was found in period.


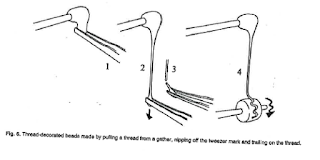
5. I made a melon bead (which I also did in 104 COE, but it was easier with the 120 COE glass), and new for this experiment, I tried and successfully made a dot bead! I suspect this would be more difficult in the open fireplace using 104 COE, but I'll have to try it some time to see. As I pulled away from the base bead when making my dot, the little tail of glass got cool quickly, so I had to try wrapping it around my glass rod, and keeping it close to the fire so the little tail of glass would flame cut itself. (I think i need to take video of this sometime!)


6. I also successfully melted some of the 120 COE glass in an iron crucible (mimicking the iron pan found at Ribe), picked the glass up with a spare mandrel (called a punty), and used that to make a wound bead. This is a method that archaeologists (see articles by Torben Sode) believe was used to make beads. Interestingly, the glass also picked up some iron from the surface of crucible (perhaps the crucible needs to be cleaned out better before use). This was interesting because it slightly changed the color of the glass, turning the yellow a bit green when compared with the original yello color of the glass. You can see this in the pictures of some of the beads we made at the end of this post. The left most yellow bead is the one that reacted with the iron in the crucible.


7. Regarding the Fireplace: Making it one firebrick high (and not two like last time) seemed to work well. It took less charcoal to fill (although we still went through almost one bag during the several hours we were working). I did not mortar the bricks together, which allowed us to remove a brick and sweep out the coals when they got too ashy, and then we could use a coal or two to quickly restart the fire. I think were were back up and running in 20 minutes or so. Next time I might mortar three sides together (leaving the one open for ash removal). It was steady enough un-mortared, especially since we double layered the fire bricks, but i'd feel a bit better with it more secure. The copper pipe should definitely be mortared in place, as the hole we drilled was a bit to large for it to fit securely and it kept moving.


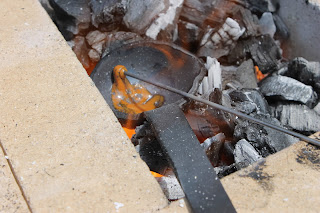
8. There was some interesting things happening on the bottom of the fireplace near where the copper pipe was. More so than last time, perhaps because the fireplace was smaller? I'm not quite sure what is going on here, but this may be similar to some vitrification near the blow hole described in a formally published experimental archaeology article (by Sode or Gam, I forget who). However, this was not something seen at Ribe, so it may point to a different furnace design. I will want to read up on this a bit more, and try to figure out what exactly is going on here. They did have some burned and darkened clay found on the hearths at ribe, so maybe this is the same thing?? The picture below is of the bottom of the furnace during mid-day when we cleaned it out.

The end of the copper pipe also started melting by the end of the day! Again, I don't remember this happening last time.


All in all, I learned a LOT from this day of experimenting!