Showing posts with label SCA Award Medallions. Show all posts

Monday, April 3, 2017

Beads made as Tokens/Gifts for K&Q A&S


Laurel pendant given to my co-champion


Beads for TRM's

Judges Tokens


Saturday, July 2, 2016

Naomi's Laurel Medalionchain

This medallion is different from the others i've made as it has two layers (ivory and yellow) for the laurel leaves.


Chain is size adjustable. I got the idea for the decorative S's from a modern metalworking book.

Wednesday, March 9, 2016

Silver Crescent Necklace


Like the necklace I made for Ysmay upon stepping down as Bhakail's A&S champion, this chain is based on a Roman chain, the design for which I learned at Pennsic during a class. A link to a museum photo of a Roman wire wrapped chain can be found here. 

Silver Wheel Award Medalion

Silver Wheel Award Medallion

Saturday, September 26, 2015

Silver Rapier Glass Bead Award Medalion

My first attempt at a glass bead Silver Rapier  award medallion was quite a mess. I tried to imitate the swept hilt of the rapier, and I just could not get all that detail into a bead of the size I wanted to make (note: I shaped the bead with my lentil press). My second attempt, while not great, at least helped me to realize that a simplified design (where I just drew the knuckle-bow of the sword) would work better.


attempt 1

attempt 2

By the third attempt I had a working design, which I turned into a medallion and traded to a friend. The main issue I had with this version of the bead was that the sword did not have a point!


After one more only so-so attempt at this bead I finally managed to get one that I like. In the design I emphasized the pommel and end of the quillons by adding a small dot to the end of the crossed lines I drew on the bead. I made the sword point by heating up the tip of the line and quickly pulling it into a point while removing a bit of glass. Finally, I only melted the design part way into the bead so that the design would stay crisp. Glass will sometimes distort and expand as it melts into glass, and white is a very soft color. Over time, I might be able to make this better by making the design with a thinner stringer of glass.


Monday, April 20, 2015

Silver Crescent Medalion Glass Bead

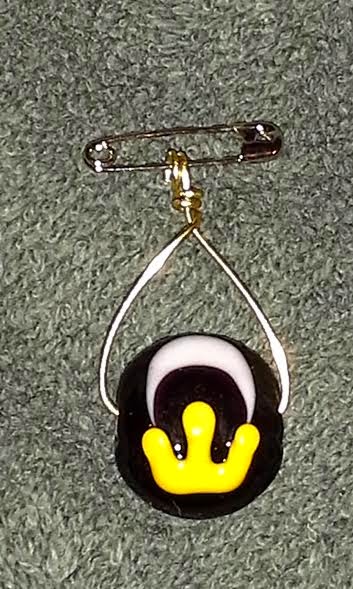
The Silver Crescent bead was much more difficult for me to make than the Laurel or Maunch bead. The design, at least the one I found to be most successful, is not as straightforward and simple as the simple line drawing of the maunche or the raked dots that I used to make the laurel bead.

Below are some of the successful beads that I have made with this design. One will be mine, and two others will go to members of my households. As you can see, there is still some variability in their design, especially in the shape of the crown. However, I think i've gotten the basic trick of it. If I were to make a handful more, I think they would start to look a bit more alike with practice. Thanks go out to Carowyn for teaching me a method to make the crescent at the top. All of these were made using a bead pressed flat by a modern lentil shaped bead press.


First Attempt:
To make the crescent shape at the top I first tried something that Carowyn suggested, a "masked dot." This is a fun dot design that I had read about in modern glass bead making books. To make the masked dot I placed a white dot on the black background, and then I covered up half of the white dot with a black dot the same color as my background bead. This essentially "masks" part of the dot, forming a crescent shape. Looking back, I think I made the dot too large on my first attempt, which is why I assumed that this method would not work well, and why I went on to try a different way of making the crescent for a while. The huge crescent certainly did not leave me much room to play with the crown shape at the bottom!

To make the crown, I created a line of yellow using a thick stringer, and then I pulled the line up at three points. I did this by heating up just the line (keeping the base of the bead cool) and pulling on it with a piece of my stringer. If I keep the stringer cool, the cool stringer will pull the molten glass. This is a similar principle to what bead makers do to make raked dots. I did not have quite enough glass in the crown on this first attempt to rake the points up very far.


 Second Attempt:
For my second attempt, i tried placing a line of white glass and then dragging and pulling it into a a crescent shape. It sort of works here, so I decided to keep trying to see how much better I could make the crescent shape.

The crown on this attempt is better. A bit think, because I melted it into the base bead pretty far, but the shape is much better than my first try.


Other Attempts:
After trying to make the crescent by pulling the glass into shape several times, I figured out that this method is not going to work for me. It just doesn't look very good. 

The crown is working ok, and as I make more of these I realize that if I only melt the crown in a little bit, the shape stays crisper. The best example of this is the bead in the top of the left picture below. Over time I also started to add three dots on top of/but touching the yellow stringer line I make for the crown. I place these dots where I want the points of the crown will be. This gives me extra glass to use when I drag the points up to form the crown shape.


Final Attempts: 
Here, I went back to my initial idea of making the crescent using the "masked dots" technique. However, I created  a much smaller dot (top bead below) than I did at first. I  wass very happy with the results. I was even able to make the "masked dot" a bit bigger (bottom bead below) and still have enough room to form the crown on the bead.

I also decided here to add dots to the top of the crown (top bead below). I think this adds a little "something" to the shape of the crown.

Using this basic model I then made the three beads pictured at the start of this blot post. Overall, it took me about 10 attempts to figure out a method that worked for me!


Also, if you stumble upon this blog randomly, and want to know where you can purchase a silver crescent bead, another bead maker sells them here


Monday, April 13, 2015

Glass Laurel Medalions


A friend of mine recently got her Laurel, so I was inspired to try to make a laurel medallion bead for her. The one I gave her is the bead on the top.

The technique used is a basic bead decoration technique, but one that does require a good bit of practice to learn to do well/accurately. Basically, I placed two semi-circular rows of dots on each side of the bead and then raked down from the top center to the bottom center on each side. I placed the dots on a bead I had pressed flat with a lentil shaped bead press. When raking dots learning how close or far apart to place them is important. In general, the beads have to be closer together than you might think to achieve the desired effect.

It took me a few attempts to get it right. I'll try to find some of my other "draft" beads and go back and post pictures of those too. However, the one thing I realized after making the bottom bead, was that there should be fewer leaves on the inside of the laurel wreath than on the outside (taking a closer look at pictures online helped me figure this out!). You can see the bead on the top looks much less crowded. I placed a dot in the bottom middle of the top bead to make the area where each branch comes together look a  bit more neat, as it did not come out quite as evenly as it did in the bottom bead.

Update (4/16):  This is the only early attempt at the laurel bead that I could find. I think I discarded my earliest attempt or two at making these beads. The bead pictured below was made on the smallest size of my bead press, and the one issue I had with it was that there is not as much of a curve to the laurel leaves as is present in the beads above. To improve this bead I would have had to make the dots smaller I think, to allow for more of a curve in their placement.


Monday, August 18, 2014

Maunche Beads

A member of my household asked if I could make a Maunche bead after seeing one made by another bead artisan. I didn't know, so i tried, and below are a few of the results. These were made at Pennsic. I've given a few to close friends/household members, and kept one for myself.


Oh, and if you stumble upon this blog entry, and want to purchase one, go to Heart of Oak Crafts on Etsy . This is the person I first saw making these beads.