From my last blog post: One of my sources, archeologists Tine Gam, has done some experimental
archeology herself, and she proposes a slightly different method.... Gam thinks that
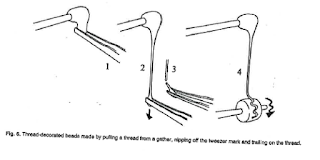
the beads were made by drawing out a thread of glass from the pontil
using tweasers, breaking off the tweaser marks (creating glass waste)
and then melting the thread onto the bead. Moving the bead back and
forth would help create the zig-zag pattern. The image below is from
the article by Gam.
I tried this method, and overall I have to say that it did not seem to work as well as the previous method tried.
First, it was hard to pull a long even stringer from the blob of glass on the pontil. Perhaps the blob of glass on the pontil needs to be heated more before it is pulled, and either I removed the glass blob too soon, or the furnace is not getting things hot enough as it is curently designed? You can see the awkward looking stringer I pulled below.

It was relatively easy to snap off the end of the stringer as described in Gam's article to get a clean point after pulling it with the pliers. It helped to dip the pliers in water and shock the glass. The piece of glass I'm holding in the pliers below also looks very much like some of the glass waste found at Ribe and described by Gam in her article.


Using the other method from the you tube video still seems to make more sense to me based on my very limited experience. In that method, the design was basically trailed out from a soft glob of glass, and how the artisan pulled the glass trail would influence the shape/size of the line decoration. More experiment with both methods is needed.
***
Finally, some thoughts on the kiln design for this workshop day. This time around I tried adding firebricks around the open fireplace to create more of a
closed design. The goal was to create a hotter fire, but I'm not sure it
helped much, as I did not notice that it was much easier/faster to make a basic wound bead. Maybe I could not get the kiln closed enough, or maybe, as Alesone pointed out, it
was too small (and held to few coals) to get truly hot. However, I did find that this time I had a bit more trouble keeping my base bead (and the stringer) at the temperature I wanted it. They would get either too hot, or not hot enough to work with. Both of these issues are ones
beginner bedmakers have, so perhaps this is a case of me needing more practice using the period fire source. Also, perhaps trying to create a covered firebrick kiln altered things just enough to cause me trouble after I had practiced on the open firebrick kiln.
Its also very worth nothing that winding glass onto a bead requires that the glass and mandrel be held in a slightly different way than when doing modern lampworking or when over an open fire. This was an adjustment I had to figure out as I was working, using the above mentioned YouTube video as a guide. The first time I tried to work as I normally did, it felt very awkward. You can see from the picture below the awkward angle created when I tried to apply glass to the mandrel in the usual way.

However, using glass on a pontil or a small piece of glass held in angled hemostats, I was able to get the correct angle for adding the glass to the mandrel in a closed kiln. The glass needs to come off the rod/pontil sideways and the mandrel is held parallel/not perpendicular to the tool holding the glass.

Note: Thanks to Decklan for his help during this workshop session! He helped me start the fire, build the kiln, and kept the bellows going. Could not have done it without him:) Melchior also helped by taking a turn at the bellows, so my thanks to him as well!
Added 9/11: Below is a link to a video of me working with stringer as discussed above. Thanks to bruni for thinking to take video.