The Silver Crescent bead was much more difficult for me to make than the Laurel
or Maunch bead. The design, at least the one I found to be most successful, is not as straightforward and simple as the simple line drawing of the maunche or the raked dots that I used to make the laurel bead.
Below are some of the successful beads that I have made with this design. One will be mine, and two others will go to members of my households. As you can see, there is still some variability in their design, especially in the shape of the crown. However, I think i've gotten the basic trick of it. If I were to make a handful more, I think they would start to look a bit more alike with practice. Thanks go out to Carowyn for teaching me a method to make the crescent at the top. All of these were made using a bead pressed flat by a modern lentil shaped bead press.

First Attempt:
To make the crescent shape at the top I first tried something that Carowyn suggested, a "masked dot." This is a fun dot design that I had read about in modern glass bead making books. To make the masked dot I placed a white dot on the black background, and then I covered up half of the white dot with a black dot the same color as my background bead. This essentially "masks" part of the dot, forming a crescent shape. Looking back, I think I made the dot too large on my first attempt, which is why I assumed that this method would not work well, and why I went on to try a different way of making the crescent for a while. The huge crescent certainly did not leave me much room to play with the crown shape at the bottom!
To make the crown, I created a line of yellow using a thick stringer, and then I pulled the line up at three points. I did this by heating up just the line (keeping the base of the bead cool) and pulling on it with a piece of my stringer. If I keep the stringer cool, the cool stringer will pull the molten glass. This is a similar principle to what bead makers do to make raked dots. I did not have quite enough glass in the crown on this first attempt to rake the points up very far.

Second Attempt:
For my second attempt, i tried placing a line of white glass and then dragging and pulling it into a a crescent shape. It sort of works here, so I decided to keep trying to see how much better I could make the crescent shape.
The crown on this attempt is better. A bit think, because I melted it into the base bead pretty far, but the shape is much better than my first try.

Other Attempts:
After trying to make the crescent by pulling the glass into shape
several times, I figured out that this method is not going to work for
me. It just doesn't look very good.
The crown is working ok, and as I
make more of these I realize that if I only melt the crown in a little
bit, the shape stays crisper. The best example of this is the bead in the top of the left picture below. Over time I also started to add three dots on top of/but touching the yellow stringer line I make for the crown. I place these dots where I want the points of the crown will be. This gives me extra glass to use when I drag the points up to form the crown shape.


Final Attempts:
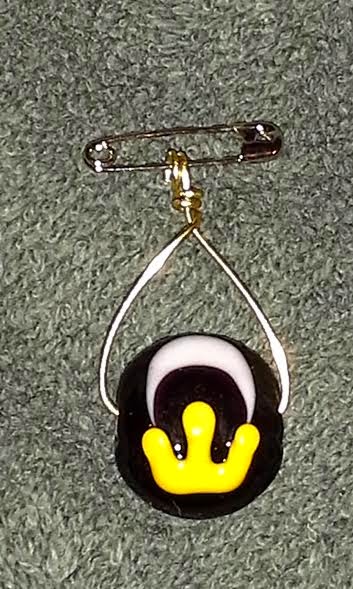
Here, I went back to my initial idea of making the crescent using the "masked dots" technique. However, I created a much smaller dot (top bead below) than I did at first. I wass very happy with the results. I was even able to make the "masked dot" a bit bigger (bottom bead below) and still have enough room to form the crown on the bead.
I also decided here to add dots to the top of the crown (top bead below). I think this adds a little "something" to the shape of the crown.
Using this basic model I then made the three beads pictured at the start of this blot post. Overall, it took me about 10 attempts to figure out a method that worked for me!

Also, if you stumble upon this blog randomly, and want to know where you can purchase a silver crescent bead, another bead maker sells them here